

The final walkthrough isn’t a quick look around before collecting the keys. It’s the moment to turn what you see and test into a clear record. If you’re worried about missing a defect or having a verbal note fall through the cracks, a final walkthrough checklist for new home buyers gives you a steady, room-by-room way to review finishes, fixtures, and key systems before possession.
A new build can look complete while still having unfinished or faulty details. That’s why the buyer’s walkthrough matters, but it isn’t the same as the City of Vancouver’s final building inspection, which checks code and safety compliance rather than cosmetic finishes. The walkthrough process and any agreed deficiency list are shaped by your purchase contract.
This guide covers what to inspect visually, what to test, and how to record each issue with a precise location and photos. You’ll also learn what to clarify about follow-up, handover documents, and BC’s 2-5-10 home warranty, so you can approach possession with an organized record and greater confidence.
Key Takeaways
- Use a final walkthrough checklist for new home handover to review each room in a consistent order, from visible finishes to working fixtures.
- Test key home systems and controls, and note which operating instructions or demonstrations you still need.
- Record each deficiency with its exact location, a clear description, and photos so follow-up is easy to track.
- Keep the buyer walkthrough distinct from municipal inspections and warranty processes, which serve different purposes.
- Before moving in, review the written follow-up record and clarify outstanding items, access instructions, and handover documents.
What a final walkthrough checklist for a new home should accomplish
A final walkthrough is a structured visual and functional review of the home before handover. You and the builder review visible finishes, check how accessible features and fixtures operate, and identify incomplete work or concerns that need follow-up. A final walkthrough checklist for new home handover keeps that review focused. It also turns observations into a clear record instead of relying on memory or verbal notes.
The walkthrough has limits. It doesn’t guarantee that every concealed condition will be identified, replace an independent home inspection, or take the place of formal warranty processes. An independent inspection is a separate assessment of the home’s condition; this Home Inspection Overview provides general background on that distinct process. The walkthrough, by contrast, gives you and the builder a chance to review visible completion and operation together. Keep the purpose clear and treat each process and its documentation separately.
What the new-home walkthrough is, and is not
Think of the appointment as a coordinated review, not a rushed tour or a search for a guarantee. Check what you can see and operate, compare completed work with the agreed plans and selections, and document anything that needs clarification or action. Arrange the review when rooms, equipment, and relevant areas can be examined properly, and allow enough time to move through the home methodically.
The walkthrough doesn’t replace the purchase agreement, an independent inspection, or warranty documents. If an item needs further assessment, record it as a question or assessment request rather than treating a brief visual check as a definitive diagnosis.
Prepare a useful checklist before the appointment
Preparation makes the visit more efficient. Bring the approved plans, finish selections, appliance details, and notes from earlier project discussions. These give you a reference for comparing the finished home with what was agreed. Bring a charged phone for notes and photos, a flashlight for dim areas, a small level for observations, and removable labels to mark locations without damaging finishes.
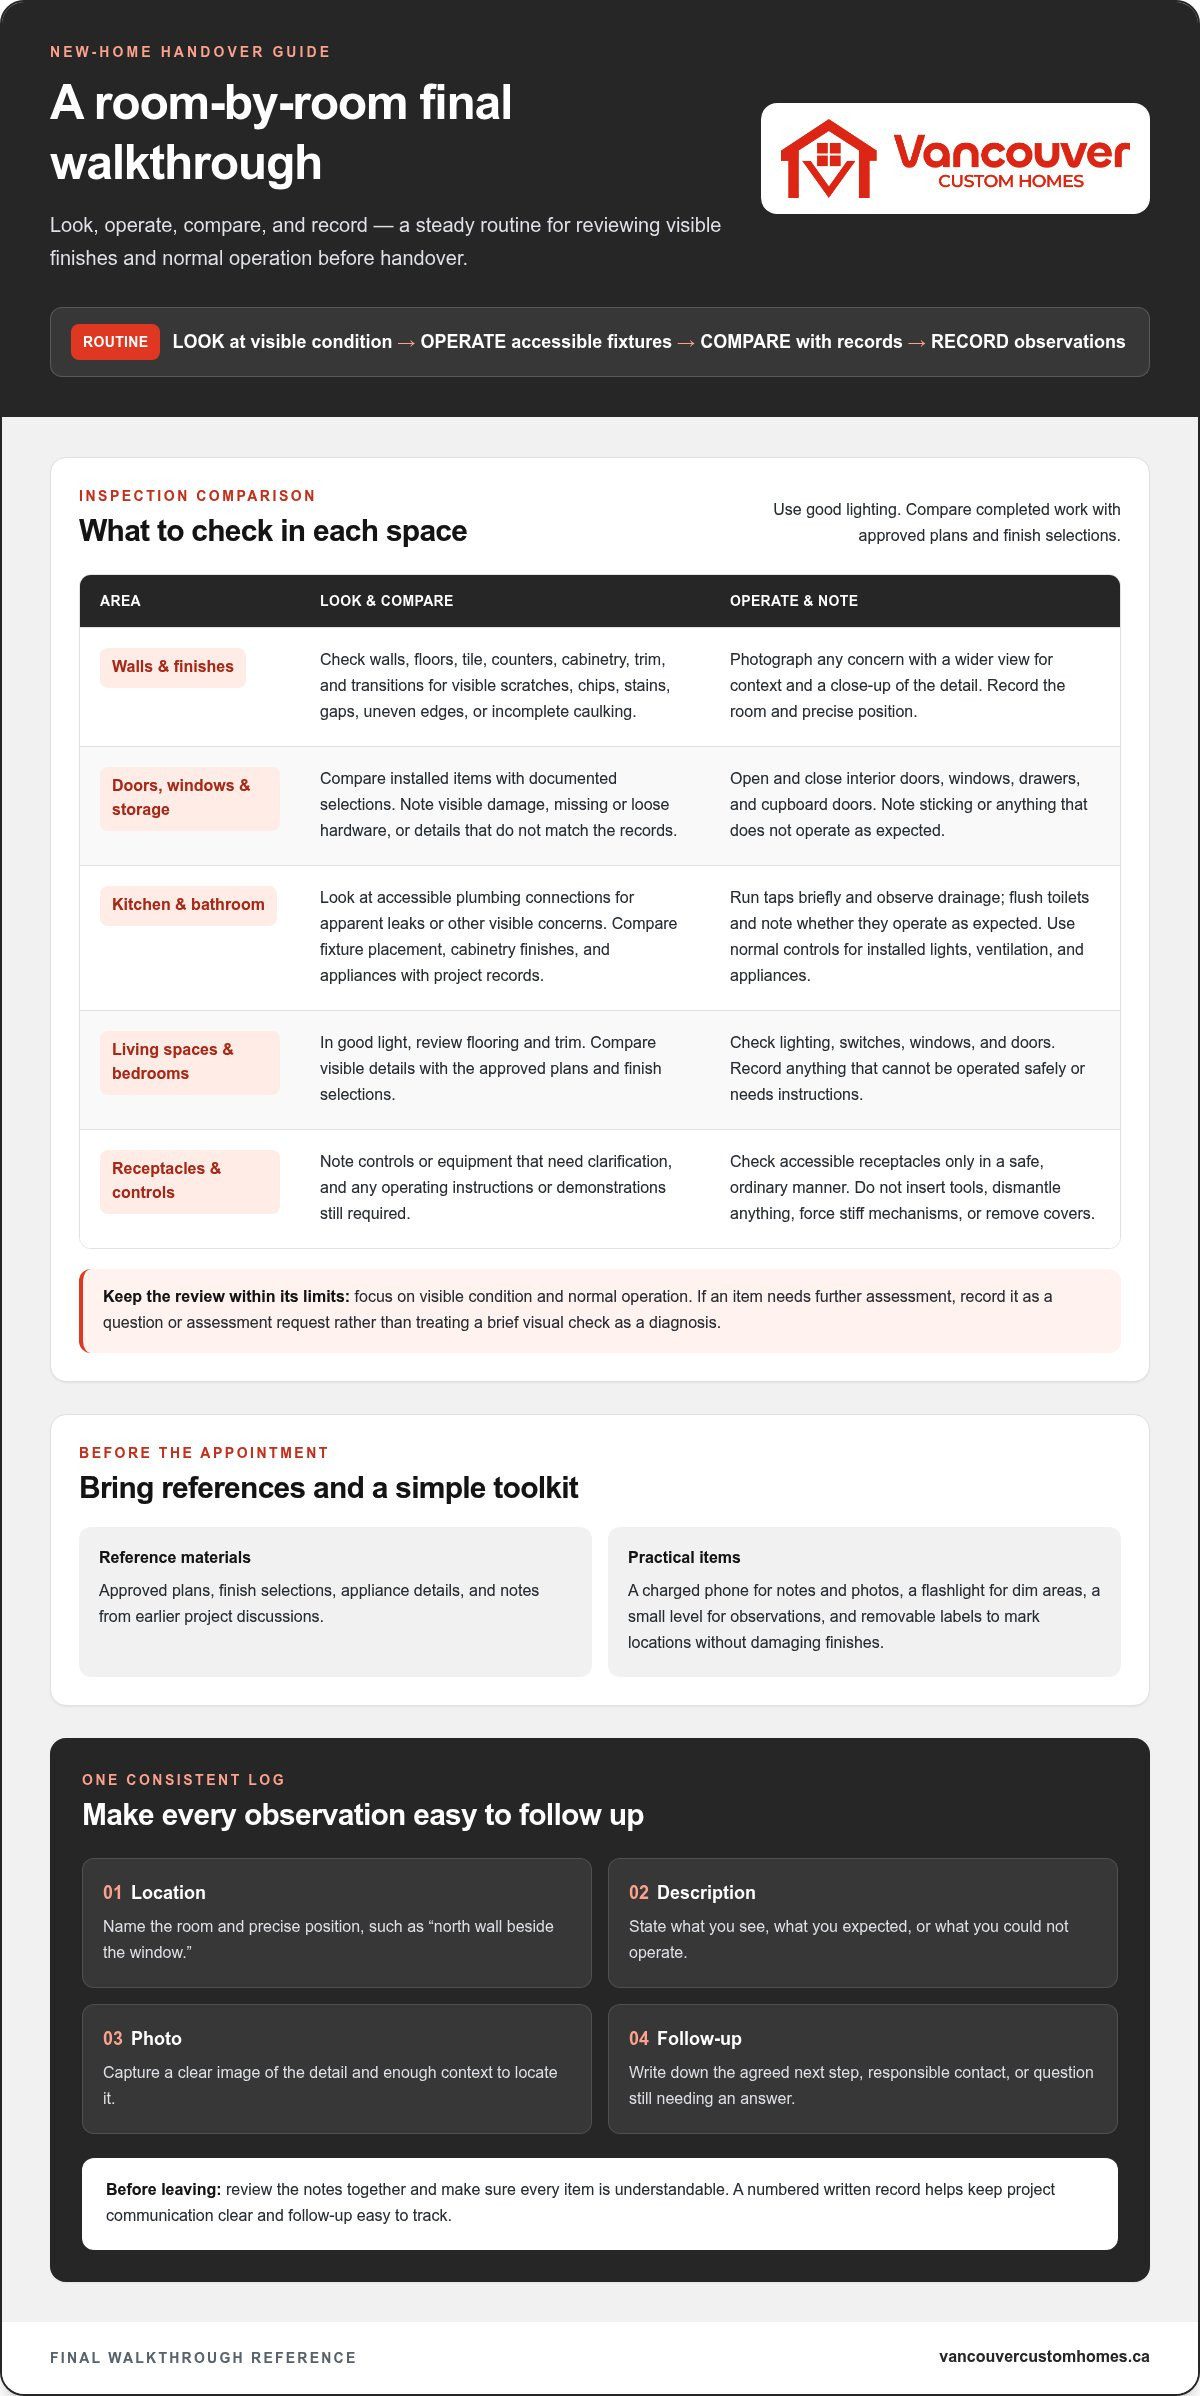
Use one consistent log for the whole walkthrough. For each observation, capture:
- Location: Room and a precise position, such as the north wall beside the window.
- Description: What you see, what you expected, or what you couldn’t operate.
- Photo: A clear image showing the detail and enough context to locate it.
- Follow-up: The agreed next step, responsible contact, or question that still needs an answer.
Before leaving, review the notes together and make sure every item is understandable. A numbered written record supports clear project communication and makes follow-up easier to track. The goal isn’t to settle every question on the spot. It’s to leave with observations, locations, and next steps recorded clearly.
How to inspect rooms, finishes, and fixtures in a new home
A repeatable routine makes it easier to spot differences and keep your review moving without rushing. In every room, look, operate, compare, and record: examine visible surfaces, test accessible fixtures, compare installed items with approved plans and finish selections, then note anything that needs attention. This consistent sequence is the working core of a final walkthrough checklist for new home buyers.
A room-by-room finish and fixture review
Use good lighting to check walls, floors, tile, counters, cabinetry, trim, and transitions between materials. Look for visible scratches, chips, stains, gaps, uneven edges, or incomplete caulking. Open and close interior doors, windows, drawers, and cupboard doors. Note sticking, damage, missing or loose hardware, and anything that doesn’t match the documented selections.
Photograph each concern twice: take a wider image showing where it is, then a close-up of the detail. Give each note a room and a specific location, such as “kitchen, island end panel.” That context makes a photo useful during follow-up instead of leaving everyone to guess which mark or gap it shows. Compare your observations with project plans and selection records, not memory alone.
Test kitchens, bathrooms, and living spaces systematically
Move from visible surfaces to basic operation. In kitchens and bathrooms, run taps briefly, observe drainage, and look at accessible plumbing connections for apparent leaks or other visible concerns. Flush toilets and note whether they operate as expected. Test installed lights and switches, ventilation controls, and appliances using their normal controls. Check accessible receptacles only in a safe, ordinary manner; don’t insert tools or dismantle anything.
In living spaces and bedrooms, check lighting, switches, windows, and doors, then look at flooring and trim in good light. If an appliance or system can’t be operated safely, or its instructions aren’t available, record the question for follow-up. Don’t force a stiff mechanism, remove covers, or perform a test that could damage a finish or create a hazard. Keep the review focused on visible condition and normal operation.
For a Vancouver-area project, approved plans, finish selections, and project records provide the clearest reference for what was specified. Use them to check details such as fixture placement, cabinetry finishes, and installed appliances. If an item differs from the selection record, note its location and the difference you observed. Clear comparisons make the walkthrough record practical and support organized follow-up.
For custom residential construction in Metro Vancouver, explore custom home construction in Vancouver as part of understanding the design-and-build process.
Which home systems and Vancouver-area site details deserve attention?
Visible finishes are only part of the review. A useful final walkthrough checklist for new home handover also covers how essential systems operate, where key controls and shut-offs are located, and what you can observe around the exterior. Ask for demonstrations rather than guessing at unfamiliar equipment. Record anything that doesn’t respond as expected, including error messages, unusual sounds, or visible leaks.
Test essential systems without overstepping
With the project team, operate accessible thermostats and ventilation controls, run faucets, and review supplied equipment using its normal controls. Ask for an explanation of heating, cooling, hot-water, and ventilation systems, including where shut-offs are and how to access routine maintenance points. Note equipment labels and collect available manuals or operating instructions. Don’t remove covers, adjust unfamiliar components, or attempt tests that could damage equipment.
Use this simple distinction to decide what to record and what to clarify:
| Review type | Example | What to record |
|---|---|---|
| Observation | A visible pipe connection looks damp, or a downspout outlet appears blocked. | Exact location, what you see, and a photo. Avoid diagnosing the cause. |
| Safe functional test | Operate a thermostat or ventilation control as demonstrated. | What you tried and whether the control responded as expected. |
| Specialist question | An error message appears, or equipment makes an unfamiliar sound. | The message or sound, when it occurred, and who will clarify or assess it. |
Review the building envelope and site after wet weather
Metro Vancouver’s rainy conditions make visible water-management details worth observing, especially if the site has recently had wet weather. From accessible areas, look at grading near the home, downspouts, visible drainage paths, and places where water appears to collect. Note blocked paths, pooling, visible damage, or exterior sealant that appears incomplete. These are observations to document, not proof of a hidden defect.
Also check that windows and exterior doors operate, and look at visible transitions and exterior penetrations, such as where services enter the building. Don’t probe sealant, open assemblies, or try to determine whether moisture is concealed behind a finish. Record the location and conditions you can see, then note any question that needs further assessment. This keeps the walkthrough precise and distinguishes a straightforward observation from a technical concern.
How to document walkthrough deficiencies and agree on follow-up
A useful walkthrough record does more than list what looks wrong. It makes each observation easy to locate, understand, review, and track. Keep descriptions factual: note what you saw or tested, not what you assume caused it. Sort items into incomplete work, visible damage, operation questions, and concerns that may need further assessment. This helps the project team respond to the issue without treating an observation as a confirmed diagnosis.
Create a deficiency log that is easy to act on
Use the same sequence for each item in your final walkthrough checklist for new home handover:
- 1. Identify: Give the item a unique number.
- 2. Locate: Name the room and precise surface, fixture, or exterior area.
- 3. Describe: Record what is incomplete, damaged, or not operating as expected.
- 4. Photograph: Attach a clearly labelled image that shows both the detail and its location.
- 5. Review: Go over the item with the project team and clarify what happens next.
- 6. Track: Note the agreed next step, who is responsible, the expected timing, and current status.
For example, write “Item 04, ensuite, vanity drawer catches before closing,” rather than “bad cabinet.” If the reason isn’t clear, log the behaviour and mark it for clarification or assessment. Before ending the review, make sure both sides are working from the same written record. Agree on next steps and timing for each item, but don’t assume one repair schedule applies to every project or issue.
Keep handover and warranty records organized
Save the final walkthrough notes and photographs with related project communications. Keep available manuals, product information, care instructions, and handover documents together so you can find them after moving in. Review the new-home warranty paperwork, including its reporting process and any stated time limits. If a concern arises later, preserve dated photos and written messages, and follow the instructions in the applicable warranty documents. Coverage and procedures depend on the paperwork and current requirements, so don’t rely on informal notes alone.
A clear project record supports continuity from construction through handover. For a custom residential build, explore custom home construction in Vancouver and how an integrated design-and-build process can keep project communication organized.
Post-Walkthrough Steps Before Moving Into Your New Home
The review isn’t complete just because you’ve finished walking through the rooms. Before moving on, compare your notes with the written follow-up record. Make sure every outstanding item has a clear description, a recorded next step, and a way to track progress. This final check connects what you observed with what happens after possession.
A practical pre-move handover checklist
Use this short list to confirm the practical details are in order:
- Access: Confirm you’ve received the keys and any relevant access instructions or codes.
- Systems: Review demonstrations and instructions for operating the home’s controls and equipment.
- Documents: Collect available manuals, care information, plans, selections, handover documents, and warranty paperwork.
- Outstanding items: Check that each open item has a written description, a communication route, and a status or agreed next step.
- Records: Store the walkthrough notes and photos with project communications and warranty documents so they’re easy to retrieve.
If something is missing or unclear, record the question and the response in writing. A complete record helps you distinguish an item that’s still being followed up from a document or instruction you simply haven’t received yet. Keep your copies organized from the start.
How coordinated project communication supports a clearer handover
Handover is the final coordinated stage of a residential design-and-build project. Organized milestones and project records give homeowners a useful reference for understanding what has been completed and what remains in progress. Vancouver Custom Homes provides project management portal access to track progress and milestones, keeping project updates and related communication together as you follow outstanding items after possession.
A final walkthrough checklist for new home handover works best alongside that project history. The checklist captures what you observe at the review; earlier plans, selections, and project updates provide context. For more on how this type of record-keeping can support communication, look for the article on home builder client portal benefits.
Vancouver Custom Homes brings design and construction together for custom homes, laneway homes, and multiplex projects in Metro Vancouver. Its in-house design services and 3D VR walkthroughs help clients visualize a project before construction begins.
Make Your Handover the Start of a Confident Move
A final walkthrough is most useful when it gives you a clear record, not just a quick impression of the home. Follow a room-by-room routine, test accessible systems safely, and record each concern with its location, description, photo, and agreed next step. Keep the written follow-up and handover documents organized so you can refer to them after possession.
A well-prepared final walkthrough checklist for new home handover helps turn a big milestone into a manageable process. It also connects the final review to the wider project journey, from design decisions to construction updates. For custom homes, laneway homes, and multiplex projects across Metro Vancouver, Vancouver Custom Homes provides in-house design services, 3D VR walkthroughs, and project management portal access to track progress and milestones.
Vancouver Custom Homes builds residential projects in Vancouver, Burnaby, West Vancouver, North Vancouver, Richmond, New Westminster, Coquitlam, Port Moody, Port Coquitlam, Maple Ridge, Pitt Meadows, Langley, Surrey, and Delta. Explore Vancouver Custom Homes’ integrated design-and-build approach to start planning your custom home, laneway home, or multiplex project.
Frequently Asked Questions
What should I bring to a final walkthrough of a new home?
Bring your approved plans, finish selections, appliance details, and notes from earlier project discussions so you can compare the home with the agreed design. A charged phone helps you record observations and take photos. A flashlight can help in dim areas, while a small level may assist with noting visible concerns. Keep a consistent log for item numbers, exact locations, descriptions, questions, and follow-up.
How long does a final walkthrough for a new home take?
There’s no single duration that suits every home. The time needed depends on the home’s size, layout, systems, and the number of items to review. Allow enough time to move through each room without rushing, operate accessible fixtures, review key systems, and document questions. If an area or system can’t be reviewed during the appointment, record it and agree on how it will be followed up.
Should I hire a home inspector for a new-build walkthrough?
An independent home inspection can provide a separate assessment of the home’s condition, while the builder walkthrough focuses on visible completion, finishes, and basic operation. One doesn’t replace the other, and neither guarantees that every concealed condition will be found. If you arrange an independent inspection, keep its findings distinct from the walkthrough record and follow the inspection and possession terms in your purchase agreement.
What happens if I find deficiencies during the final walkthrough?
Record each concern in writing with a unique number, precise location, neutral description, and clearly labelled photos. Review the items with the project team and note the agreed next step, responsibility, timing, and status. Keep a copy of the written record and related messages. If an issue may involve warranty coverage, follow the reporting instructions in your warranty documents and send required written notice within the applicable coverage period.
Can I refuse to take possession if items remain unfinished?
Whether you can delay or refuse possession depends on your purchase agreement and the circumstances. Don’t assume that an unfinished item automatically gives you the right to withhold possession, or that taking possession removes all options. Document the item, review the contract’s handover terms, and get advice from your conveyancing lawyer or notary before making a decision that could affect closing.
What should I check outside a new home in Metro Vancouver?
From safely accessible areas, observe visible grading, downspouts, drainage paths, and places where water appears to pool, especially after wet weather. Look for visible exterior damage, incomplete sealant, and the transitions around windows, doors, and service penetrations. Note what you can see without probing or opening building assemblies. These checks are observations, not a diagnosis of concealed moisture or structural conditions.
Does a final walkthrough replace a new-home warranty inspection?
No. The walkthrough is a review of visible finishes, completion, and basic operation; warranty coverage and claims follow the terms and reporting process in your policy. In British Columbia, 2-5-10 coverage generally addresses materials and labour, building-envelope water penetration, and structural defects across different coverage periods. Review your documents carefully, and provide written notice to both the builder and warranty provider before the relevant period expires.


